Promethean Tech Water Engineering
Lot 2-26, 2nd Floor, Block C,
Jalan Kajang Perdana 3,
Taman Kajang Perdana,
43000 Kajang,
Selangor, Malaysia
![]() +6010 365 7348
+6010 365 7348
![]() +6016 442 1112
+6016 442 1112
CHLORINE FLEXIBLE CONNECTOR
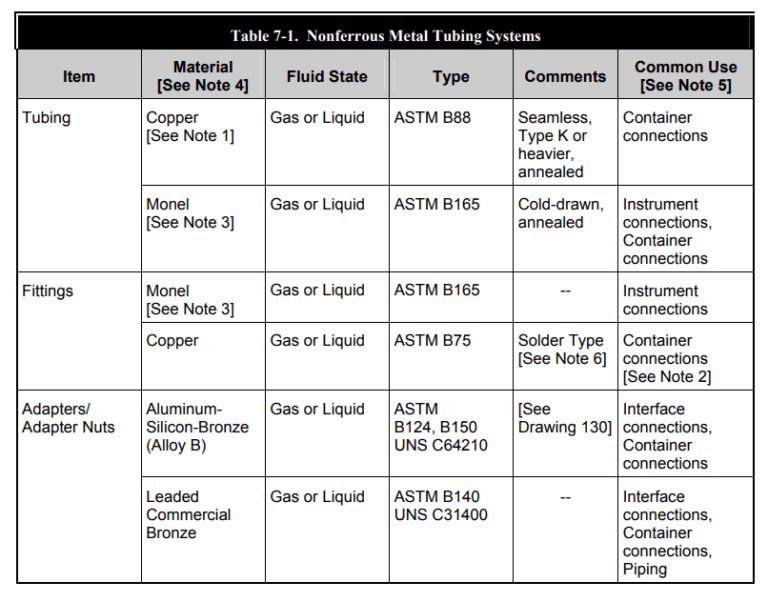
Nonferrous metal piping or tubing is generally used for flexible instrument or no permanent connections. Aluminum, titanium, and tin must not be used because chlorine reacts with these materials at ordinary temperatures. Where flexible connections are required between transportation containers and rigid piping systems, copper and copper alloy construction may be used. Because of the reaction between chlorine and tin, no tin should be used in brazing alloys for flexible connection fittings. Therefore, silver brazing alloys must contain no tin and should contain at least 44% silver. In situations requiring protection against external corrosion, protective coatings such as cadmium or zinc plating are recommended. Hydrogen embrittlement is not a typical failure mechanism for non-ferrous metals.
Flexible connectors provide an adjustable and conformable path to attach one or more upright cylinders or ton containers to a pressure manifold or wall mounted vacuum regulator. These flexible connectors are fabricated using 3/8” copper tubing which allows good flexibility without compromising wall thickness, safety and are SILVER plated to resist corrosion in harsh environments.
Changing Chlorine Cylinders:
- Only trained operators to change chlorine cylinders.
- Close the main chlorine container valve on the cylinder.
- Allow the system to purge itself of chlorine gas – ensure that the float drops to the bottom of the feed-rate indicator (rotameter).
- Verify that there is a high vacuum.
- Loosen the chlorinator flexible connector from the cylinder valve, whilst checking for leaks – using the ammonia squeegee / test bottle release ammonia vapour.
- If no chlorine leaks are detected remove the chlorine flexible connector
- Replace the valve end cap and safety hood.
- Move empty cylinder using a cylinder trolley to the empty container storage location.
- Secure the empty cylinder in place.
- Move a full chlorine cylinder to dosing location using a cylinder trolley.
- Remove the protective hood from the new cylinder.
- Ensure that there is no chlorine leaking from the packing gland – using ammonia squeegee bottle.
- Ensure that the cylinder valve is closed. Do not open the valve yet.
- Ensure there is no chlorine leak from valve assembly using the ammonia test bottle – if no leak, remove end cap.
- Check that the cylinder outlet valve face is clean and smooth.
- Using a new washer (lead), connect the vacuum regulator pipe yoke assembly to the cylinder outlet valve – using only the correct wrench which is supplied.
- Crack-open the chlorine cylinder valve and then quickly close it again – this will let enough chlorine into the line to charge it.
- The valve should open with no more than a sharp rap from the heel of your hand – never use a “helper” wrench or a larger wrench than the one supplied.
- If the valve will not open, report the situation to the supervisor and the cylinder should be returned to the supplier and another one should be used.
- Check all the connections you have made to ensure there are no leaks – use the vapour from the ammonia test bottle.
- lf a leak is detected ensure that the required PPE as identified in (PPE Required (emergency operations) is used and check that all connections are securely tightened and that no damage has occurred to the pipe or fittings – once again follow step 20 and re-check.
- When no leaks are detected, open the chlorine cylinder valve no more than half a turn and leave the cylinder wrench on the valve spindle.
- Open any additional system valves and test for leaks using the ammonia test bottle.
- Ensure that the alarm system is functioning and leave the room.
Chlorine Flexible Connector | |
Available Sizes | Cart No. |
5/8″ x 5/8″ x 5′ | FLX 5858-5 |
5/8″ x 3/4″ x 5′ | FLX 5834 -5 |
3/4″ x 3/4″ x 5′ | FLX 3434-5 |
5/8″ x 5/8″ x 6′ | FLX 5858 -6 |
5/8″ x 3/4″ x 6′ | FLX 5834-6 |
3/4″ x 3/4″ x 6′ | FLX 3434 -6 |
5/8″ x 5/8″ x 10′ | FLX 5858 -10 |
5/8″ x 3/4″ x 10′ | FLX 5834-10 |
3/4″ x 3/4″ x 10′ | FLX 3434 -10 |
